How to Draw Deer Drawing
Deer
There are few seconds you can have in nature that are basically as brilliant as experiencing a beautiful deer in the forest. These delicate creatures are consistently a welcome sight, and they have come to address the smoothness and tranquility of nature. Deer & tigger drawing ideas or other latest drawing ideas tutorial live on cool drawing idea.
Deer assume a significant part in many societies overall too, and they are a most loved creature of many individuals.
Stage 1 - deer drawing
In some cases throughout everyday life, you need to begin from the top rather than the base, and that is valid for our initial phase in this aide on the most proficient method to draw a deer!
Deer have charming, sharp ears, and we will begin with them for this step. To draw these in, you can basically involve a few bended lines with a point in them as they show up in the reference picture.
Stage 2 - Next, attract a greater amount of the head
For this step of your deer drawing, we will include the remainder of the head frame under the ears. Cautiously attract a few additional rakish shapes to frame the primary layout of the head.
Then, at the front of the face, you can attract a more adjusted shape as you can find in the reference picture. We will add the gag of the deer into that more adjusted region without further ado.
Stage 3 - Presently, begin to attract the body
The head frame is finished, so for this third step, we will begin to move toward the rear of the deer.
This will be a bended line reaching out down from under the ear and shaping a bended line back from the head.
When you have the back line seeming as though it does in the image, add another bended line under the front of the face to start the chest of your deer drawing.
Stage 4 - Add an additional parts to the deer's body
We're beginning to develop your deer drawing pleasantly now! For this step, we will add more to the body of the deer.
Utilizing the lines you stepped for the back and the chest of the deer, you can begin to attract the legs.
The legs are thicker at the top and afterward get more rakish as you go down. The reference picture will assist you a ton with getting the shape right!
When you have these legs drawn, basically add a bended line between them to make a tummy for your deer, and afterward expand the chest line down too.
Stage 5 - Presently, attract different legs and tail
You've proactively attracted two legs, so including different ones ought to be simpler in this step! Basically attract two additional legs that seem to be the ones you drew already, simply on the opposite side of the body.
Then, at that point, utilize a bended line to make a little tail for your deer drawing.
Stage 6 - Next, attract a face for your deer
The layout for your deer drawing is essentially finished at this point! In this step of our aide on the most proficient method to draw a deer, we will deal with a face for the deer.
The eyes for the deer are minuscule, and they sit on the sides of the face. You can then attract the mouth segment with a bended line under a strong, dark nose.
Stage 7 - How about we add a last subtleties to your deer
With the face drawn, your deer drawing is only a couple of subtleties from being prepared for some tone!
We have added s few subtleties for certain lines to the inward ears, paunch, tail and legs to make some example variety.
There is likewise a line under the head for you to variety later, and in conclusion you can add a spots to your deer too.
These are the subtleties we could add, yet what else do you suppose you'll add to it?
This is plainly a female deer, yet adding a few horns would give it an entirely different look! You might really draw a second deer that has horns to make a couple.
Drawing tusks can be a piece precarious, so you might need to utilize a few references assuming you might want to do that. You can find pictures of prongs online that could be useful to you as you draw.
We would likewise suggest drawing them delicately with a pencil before you add the last lines. This way you can get a hang of it before you focus on the real tusks.
It would likewise be cute to add a little deer calf alongside these grown-up deer. This could likewise be drawn as a slight minor departure from the deer that you attracted this aide.
On the off chance that you might want to keep the deer with no guarantees except for perhaps have a more unobtrusive variety, then, at that point, perhaps you could represent the deer in an unexpected way. For instance, it could have its head lower as it brushes or eats from a hedge.
There are numerous ways that you can change this drawing radically with only a couple of subtleties! Presently we suggest the conversation starter of how you might want to customize this drawing.
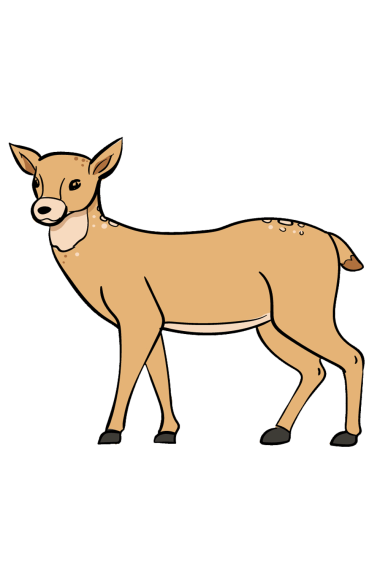
Stage 8 - Presently polish off your deer with some tone
That carries us to the last step of our how to draw a deer guide!
Now that you've effectively drawn a charming deer, all that remains is to variety it in. the reference picture we gave here shows you only one out of numerous ways that you can variety in this deer.
You could go with additional muffled, earthy colored tones to keep it looking a smidgen more practical, however you can likewise get imaginative for certain tomfoolery and special tones!