How to Use Clipping Masks in Photoshop and Illustrator

How to Use Clipping Masks in Photoshop and Illustrator
When it comes to graphic design and photo editing, few tools are as powerful and versatile as clipping masks. Whether you’re editing product images for e-commerce or creating stunning artwork, clipping masks can help you control how visuals are displayed, giving you precision and creativity in one go. While clipping path services often involve isolating objects from their backgrounds, clipping masks provide an additional layer of design possibilities—especially in Adobe Photoshop and Illustrator.
In this guide, we’ll walk you through what clipping masks are, how they work in Photoshop and Illustrator, and practical steps to use them effectively.
What is a Clipping Mask?
A clipping mask is a feature that allows one layer (the “mask”) to control the visibility of another layer (the “content”). The mask layer defines the visible area of the content layer—anything outside the mask’s shape will be hidden.
Think of it like a stencil: the top layer (mask) determines what parts of the image underneath will be visible. This makes clipping masks ideal for design projects, advertisements, and photo editing tasks. Many professional clipping path services use clipping masks for advanced visual effects.
Difference Between Clipping Path and Clipping Mask
It’s easy to confuse clipping path and clipping mask, but they are different:
- Clipping Path: A vector path used to cut out objects from their background, often delivered by professional clipping path services for clean product images.
- Clipping Mask: A design tool used to display artwork inside the boundaries of another object or shape, without permanently altering the original image.
Benefits of Using Clipping Masks
- Non-Destructive Editing – You can hide or reveal parts of a design without deleting pixels.
- Creative Design Control – Perfect for custom text effects, textures, and image frames.
- Layer Flexibility – Easily adjust, move, or swap images without losing quality.
- Seamless Integration with Clipping Path Services – You can use a clipping path to isolate an image, then apply a clipping mask for creative presentation.
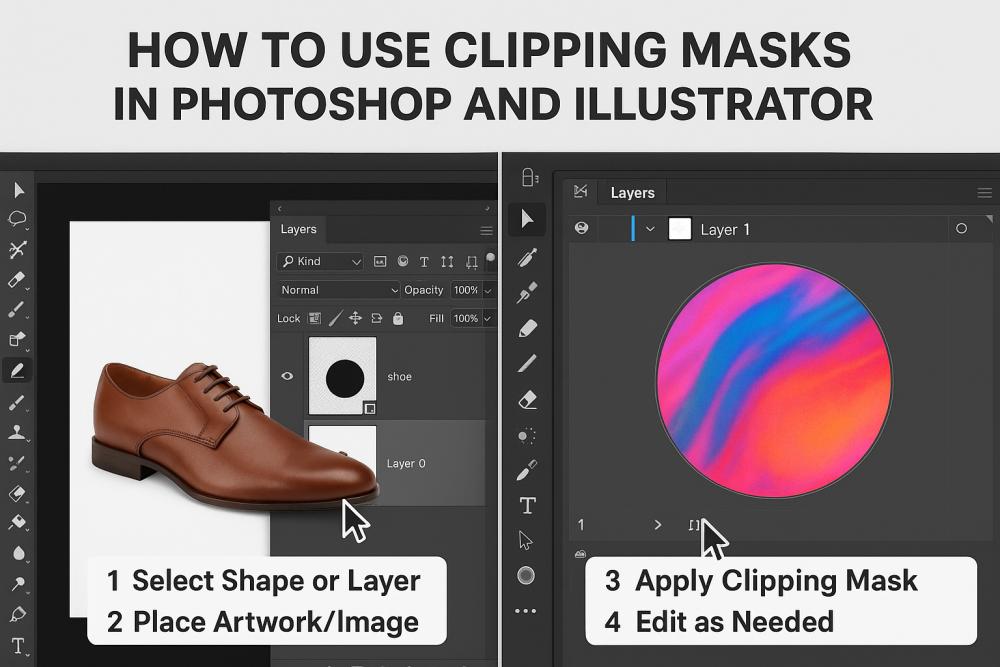
How to Use Clipping Masks in Photoshop
Photoshop’s clipping mask function is straightforward and powerful.
Step-by-Step Guide
1. Prepare Your Layers
- Place the image or texture you want to display on a new layer.
- Add the shape, text, or object that will act as the mask on the layer below the image.
2. Create the Clipping Mask
- Right-click on the image layer in the Layers Panel.
- Select Create Clipping Mask (or press Alt + Ctrl + G on Windows / Option + Command + G on Mac).
Your image will now appear only inside the shape of the layer beneath it.
3. Adjust and Refine
- Move or resize the content layer to change how it appears inside the mask.
- Apply filters, layer styles, or blending modes for creative effects.
Example Use Case:
An e-commerce brand could use clipping path services to isolate a shoe from its background, then use a clipping mask to display that shoe inside a creative text shape for a marketing banner.
How to Use Clipping Masks in Illustrator
Illustrator’s clipping mask function is slightly different, as it’s based on vector paths rather than raster images.
Step-by-Step Guide
1. Select Your Artwork
- Place the image, illustration, or object you want to mask on your artboard.
2. Create Your Mask Shape
- Draw a shape (rectangle, circle, or custom vector path) that will define the visible area.
3. Arrange the Layers
- Place the mask shape above the artwork you want to clip.
4. Make the Clipping Mask
- Select both the mask shape and the artwork.
- Right-click and choose Make Clipping Mask (or press Ctrl + 7 on Windows / Command + 7 on Mac).
5. Adjust and Edit
- Use the Direct Selection Tool to move the image inside the mask or resize the mask shape for a perfect fit.
Example Use Case:
A packaging designer might combine clipping path services with Illustrator’s clipping masks to place a product photo inside a custom-shaped label design.
Pro Tips for Better Clipping Mask Results
- Use High-Resolution Images – This ensures sharp and professional results.
- Combine with Layer Masks in Photoshop – Layer masks allow more precise control over visibility.
- Experiment with Text Masks – Fill text with images for eye-catching headlines.
- Use Vector Shapes for Scalability – Especially in Illustrator, so your designs remain crisp.
- Leverage Clipping Path Services for Accuracy – For clean edges before applying creative masks.
Common Mistakes to Avoid
- Wrong Layer Order: The mask must be above the image in Illustrator and below it in Photoshop.
- Low-Quality Images: Blurry images will reduce the professional look.
- Permanent Cropping Instead of Masking: Clipping masks are non-destructive; avoid rasterizing too early.
- Overcomplicating Designs: Keep it clean so the main subject stands out.
Why Combine Clipping Masks with Clipping Path Services?
While clipping masks handle the creative presentation, clipping path services ensure your subject is isolated with pixel-perfect accuracy. For example, in product photography, you might first use a clipping path to remove the background, then apply a clipping mask to place the product inside unique text or shapes for ads. This combination is widely used in:
- E-commerce product listings
- Branding and marketing campaigns
- Social media posts and banners
- Print advertising
Final Thoughts
Clipping masks in Photoshop and Illustrator are powerful tools that give designers the flexibility to create visually engaging compositions without permanently altering images. Whether you’re adding textures to text, shaping images into creative frames, or integrating photos into complex designs, clipping masks can elevate your work.
When paired with clipping path services, you get the best of both worlds—precise, clean extractions and limitless design creativity. Whether you’re a photographer, marketer, or designer, mastering these techniques will open the door to more professional and eye-catching visuals.